This is an unusual blog post for me, but after mentioning tiramisu ice cream on Twitter, I received a lot of interest. I’ve been making tiramisu (or at least, my slightly cheaty version of it) for years, but only started making the ice cream version last year. I’ve included both recipes in a single post as they’re so closely related.
Tiramisu
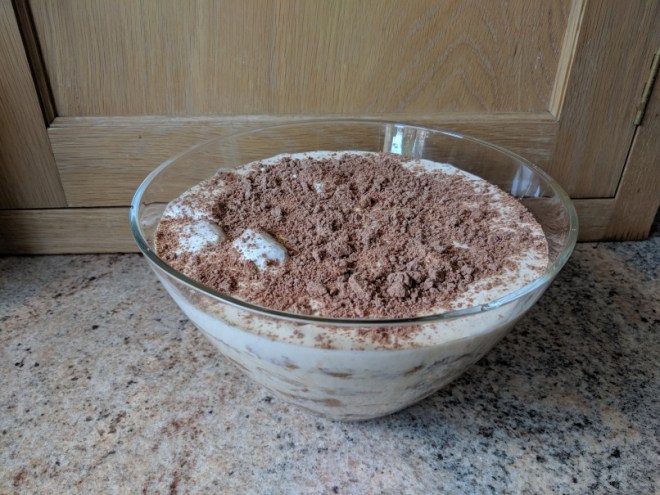
Top view:
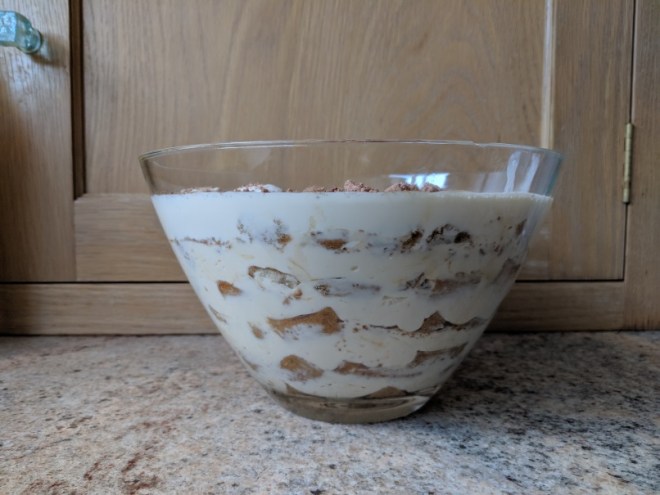
Side view, to make the layering clearer:
I often have tiramisu in restaurants as a dessert, and while it’s always nice, it’s usually quite different to the version I make. There’s no cake as such here – sponge fingers take their place.
It’s entirely possible that the term “sponge fingers” means different things in different countries. These aren’t trifle sponges (although they’re often found alongside them in supermarkets). They’re somewhere between cake sponge and biscuit – definitely crispy. I believe what I know as sponge fingers are also called ladyfingers and boudoir biscuits. Hopefully with all of those options, you can find what I mean – or something similar, at least.
I make my tiramisu in a nearly-conical glass bowl: the lower layers have a much smaller surface area than the higher layers. This recipe fits with how I do things (and the size of my bowl), but it’s all pretty loose, so please adapt it to your containers, tastes etc.
Ingredients
- 3 egg yolks
- 75g caster sugar
- 500g mascarpone
- 250ml strong coffee, cold
- Kahlua or other coffee liqueur (optional, and very much to taste – it’s great whether teetotal, moderate or full-on-boozy)
- About 40 sponge fingers
- 3 Cadbury Flakes (or similarly crumbly chocolate)
- 300ml extra thick double cream (actual quantity needed will vary)
Method
- Start several hours before you want to do the bulk of the work, by making the coffee. I make a few rounds of double espressos in my bean-to-cup coffee machine, but cafetiere coffee can work too. Put it in the fridge so that it’s cold by the time you really want to start.
- Mix the egg yolks and caster sugar together with an electric whisk, then add the mascarpone and a splash of coffee liqueur (or just coffee if you’re not using liqueur). Mix everything together carefully – this step can get really messy as the mascarpone starts off being pretty solid. You may want to start the post-mascarpone mixing by hand before using the electric whisk on a slow setting. I’ll call the result of this step the custard – it’s not really custard, but it’s close enough to be clear in meaning.
- Put the coffee and the rest of the coffee liqueur in a bowl with a base that is reasonably flat and wide enough for a sponge finger. You don’t want to end up with a lot of coffee at the bottom that’s hard to get at.
- Break a sponge finger into three pieces, and briefly dip each part into the coffee mixture, then lay them in the glass bowl next to each other. Repeat until you’ve made a layer at the bottom of the bowl. You don’t want to leave the finger in the mixture for too long: ideally each piece of the finger should end up soaking up enough coffee to give it flavour, with a soft outside but a bit of crunch left in the middle.
- Once you’ve got a complete layer of sponge fingers, spread a layer of the custard over the top. I find I need at least two spoons for this, as the custard is pretty thick. I get some custard out of the bowl with one spoon, then scrape it out of that spoon with the other one. As you’re spreading it, you may find that the sponge fingers try to lift up as well. I strongly advise you not to get too stressed over this. While the final result can be pretty, it’s rarely neat.
- Bash a Flake (still in its wrapper) with a rolling pin, and then open the wrapper so you can sprinkle the resulting crumble over the custard. I find that the first Flake lasts for a couple of layers, then I need a flake per layer (as they increase in area).
- Repeat steps 4-6, building up the layers. I usually find myself without enough custard for a complete final layer, which is where the extra thick double cream comes in: before you start the final layer, mix the double cream in with the custard. You may well then just be able to pour the result over the final sponge layer. You may want to make the final chocolate layer a bit chunkier (less thoroughly bashed with the rolling pin) than the earlier layers.
- Chill for 24 hours to firm up the custard.
Tiramisu ice cream
This recipe was adapted as a cross between my tiramisu and a strawberry cheesecake ice cream recipe I found. I have a Sage Smart Scoop ice cream maker with a 1 litre bowl capacity, so I make the ice cream in two steps as described below. I have no idea how you’d adapt the recipe for other methods of making ice cream, but I’m sure you can figure something out.
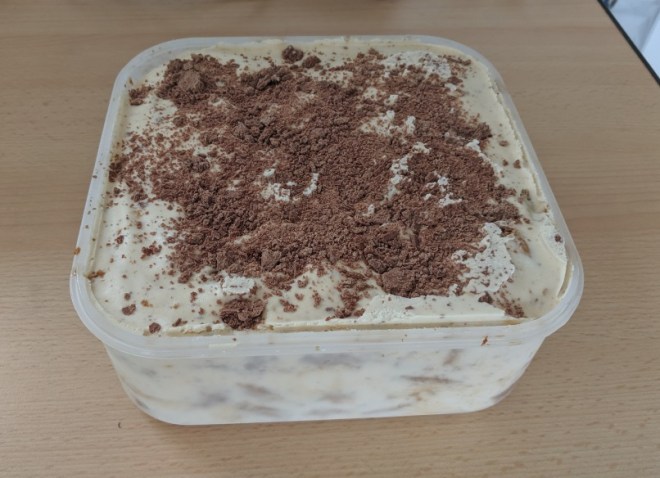
The result of the ingredients below just about fits in a 2.5 litre Tupperware box to go in the freezer. If you have smaller containers, you could either reduce the ingredients – or keep the left-over “just ice-cream” part in a different container at the end.
Ingredients
- 200g double cream
- 400g whole milk
- 8 egg yolks
- 300g caster sugar
- 500g mascarpone
- 2 teaspoons of vanilla extract
- Ice cream stabilizer (whatever you normally use)
- 250ml strong coffee, cold
- Kahlua or other coffee liqueur (optional as with the regular tiramisu; I use less alcohol for the ice cream version)
- About 40 sponge fingers
- 4 (or more…) Cadbury Flakes (or similarly crumbly chocolate)
Method
- As with the tiramisu recipe, start by making the coffee and getting that chilling. You’ll need to chill the cooked custard as well though, so there’s no need to wait after making the coffee – just get it in the fridge, and start on the custard.
- Mix the double cream, milk, egg yolks and caster sugar in a saucepan and cook on a medium heat. Stir with a balloon whisk until it thickens. (It always surprises me how long this step takes. Keep going; it will thicken eventually… but it never becomes really thick. It’s fine to take it off when it’s the consistency of normal custard.)
- Take the custard off the heat, and transfer it into a separate bowl. Mix in the mascarpone (carefully!), stabilizer, vanilla extract and a small amount of the coffee. (Using a separate bowl helps to cool the custard down immediately, and you wouldn’t want to put a hot saucepan in the fridge anyway.) Note that I only add coffee here, not the liqueur – I suspect that adding alcohol to the custard would affect the churning/freezing, but I could be wrong.
- Put the bowl of custard in the fridge to cool for a couple of hours. It doesn’t need to be really cold, just room temperature.
- Put half of the custard into the ice cream maker bowl and set it churning/freezing. I set the ice cream maker to “hard ice cream” but it still doesn’t come out genuinely hard. Leave the rest of the custard in the fridge.
- Most of the way through the churning, bash a Flake (in its wrapper) with a rolling pin, open the wrapper, and slowly pour the crumbled chocolate into the still-churning ice cream, to give it flecks of chocolate. (My ice cream maker tells me when to do this via an “add mix-ins” message.)
- Put the coffee into a shallow-bottomed bowl and add some coffee liqueur. Get the container and sponge fingers ready, and pre-bash another Flake bar.
- Once the ice cream maker has finished, you need to get to work quickly. Spread a thin first layer of ice cream in the base of the container.
- Create a layer of sponge fingers by breaking them into four pieces each (unlike the three for regular tiramisu) and dipping them into the coffee and liqueur mixture.
- Spread a layer of ice cream on top of the sponge fingers.
- Sprinkle the crumbled Flake bar on top of the ice cream.
- Repeat steps 9-11 until you run out of ice cream. Add a layer of sponge fingers so that you’re ready to add the second batch of ice cream.
- Put the container in the freezer, and make the second batch of ice cream with the remainder of the custard.
- Add another Flake bar during the ice cream making process as in step 6.
- Once the second batch of ice cream is done, take the container out of the freezer and keep building up layers as in steps 9-11. Finish with a layer of crumbled Flake.
- Put the container back in the freezer for at least 24 hours.

What a fun blog post! I’m spending the summer in Italy and you’ve officially inspired me to try making this at my flat. Buying some amaretto today… yum!
LikeLike
Yay! Please add a reply to let us know how it goes :)
LikeLike